
“Anyone who has never made a mistake has never tried anything new.”
― Albert Einstein
At OGMA, we believe in full transparency with our customers. No matter how advanced, every product may encounter issues, and we are committed to openly addressing them. Our "Known Issues" section acknowledges these challenges and provides solutions and updates. This openness helps us improve continuously and ensures you receive the best possible experience with our products. Unlike some that might hide problems, we prefer to face them head-on and use your feedback to enhance our offerings.
Thin Horizontal Bands - Rolling Shutter Noise
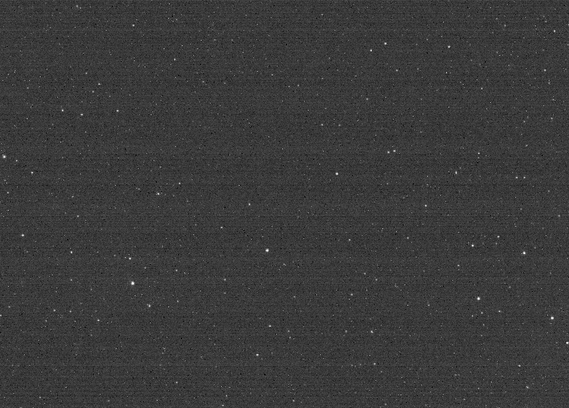
You may see thin horizontal bands when an image's histogram is stretched. Note that some astronomy software will show preview images that are automatically stretched. This shouldn't affect the final result.
A highly sensitive image sensor with a rolling shutter will likely have some banding in its raw data. What you are observing is a few photons that excited a few electrons. Enjoy the show! You are watching quantum physics playing games with a rolling shutter.
This isn't related to a particular camera brand. SharpCap previously introduced a setting in their software to mitigate banding. See the screenshot in their documentation at https://docs.sharpcap.co.uk/4.0/#!2!Pre-processing.
You may only see this banding from some camera brands because some manufacturers may mitigate banding through firmware or drivers. The risk of doing this is that faint stars and nebula may be "mitigated," too.
We have seen reports online about these thin bands on cameras from different manufacturers before the issue has been "corrected" by firmware or driver updates.
This type of rolling shutter noise is more pronounced when using narrowband filters because sometimes there is insufficient data to saturate the sensor.
Here are a few suggestions to reduce the rolling shutter noise:
Try a different conversion mode: Use HCG instead of LCG.
Increase the Offset: 100, 500, 1000
Always use dithering
Always use calibration frames for processing your images; this, combined with dithering, will help remove the banding noise while protecting the faint stars and nebula in your images.
Dead Pixels / Hot Pixels / Warm Pixels
Dead pixels:
All sensors have dead pixels; it's the nature of the manufacturing process. All IMX sensors used in astrophotography are manufactured by SONY according to their standard specifications.
Some camera manufacturers include ways of erasing dead pixels or hot pixels in their firmware. Some call this process DPS technology (Dead Pixel Suppression). The risk of erasing these pixels inside the camera is that tiny stars can be erased, too.
Some gain modes are more prone to showing dead pixels or warm pixels. For example, the HDR mode in some of our cameras outputs the data as raw as possible.
Hot and Warm pixels:
These are individual pixels on a digital camera sensor stuck at a higher brightness level. This happens with most camera sensors and are most noticeable in images with very long exposure times or very high ISO settings. These pixels can appear as bright spots in an image and may be mistaken for small stars or hot pixels in preprocessing.
One of our customers suggested that those using Pixinsight to process their images can try removing the hot/warm pixels using hot-sigma rejection (3.0 to 4.0) with Cosmetic Correction before debayering. This should help solve potential problems with star registration and alignment later. It may be possible to do the same with other software.
In general:
We believe the best way to control these sensor imperfections is through dithering during image capture and dark frames during post-processing. Dithering and dark frames are two things that you will be using in astrophotography anyway.
Very Wide Horizontal Bands in N.I.N.A.
When using the camera with N.I.N.A. version 2.2, a wide horizontal band may appear randomly in some sub-exposures. This only happens sometimes and may never happen because it depends on the CPU type of the computer controlling the camera.
A fix has been added to version 3.0 of N.I.N.A., which is currently only available as a nightly build. Since nightly builds are not recommended for everyday use, you can fix this issue temporarily by replacing the file ogmacam.dll inside your installation of N.I.N.A. version 2.2 with a copy of the same file that contains the fix.
To do so:
Download one of the following files depending on whether your operative system is x64 or x86:
ogmacam.dll (x64 version)
ogmacam.dll (x86 version)
Copy the ogmacam.dll file and paste it into the N.I.N.A. installation directory, which may be one of the following:
C:\Program Files\N.I.N.A. - Nighttime Imaging 'N' Astronomy\External\x64\OGMA\ , or
C:\Program Files\N.I.N.A. - Nighttime Imaging 'N' Astronomy\External\x86\OGMA\
Click Yes to confirm replacing the existing file with the same name.
Once N.I.N.A. version 3.0 becomes the recommended version, you can upgrade as usual, and this file will be replaced by the one that comes with N.I.N.A.
Adding the Latest OGMA Cameras to INDI
The camera model AP08CC was integrated into INDI v2.0.5. You don't need to worry about doing this if you have INDI Library v2.0.5 or newer.
Other models of OGMA cameras, such as the guide/planetary cameras GP662C, GP678C, and GP678M, are currently being integrated into INDI. If you would like to use these newer models before they are integrated with INDI, replace the file libogmacam.so in your INDI installation directory with the latest version from our SDK.
To do so:
- Create a backup of your current libogmacam.so file by renaming it to libogmacam.so_bak.
- Download one of the following files depending on whether your operative system is x64 or x86:
- libogmacam.so (x64 version)
- libogmacam.so (x86 version)
- Copy the libogmacam.so file and paste it into the INDI installation directory /usr/lib/x86_64-linux-gnu
- Click Yes to confirm replacing the existing file with the same name.
Once the next version of the INDI Library is released, this file will be replaced, and you won't need to apply this fix.
INDI Couldn't Connect
In some Linux systems running the INDI platform, the user running the program doesn't have the necessary file permission to send configurations or commands to the camera.
This manifests as a software freeze when you try to start the fan or TE cooler, or a being unable to instruct the camera to take a photo.
Before trying anything, you should update to the latest version of INDI.
If updating your system doesn't solve the problem, try the following:
1- Identify the USB ID of your camera
Open the Linux terminal and type:
lsusb
You will see something like this:
Bus 002 Device 005: ID 9745:93da TP AP26CC
This tells you that the camera AP26CC is connected with the ID = 9745.
2- Verify that INDI expects the same device ID.
As an administrator, edit your local file /usr/lib/udev/rules.d/99-ogmacam.rules and make sure the value of ATTRS{idVendor} is:
ATTRS{idVendor}=="9745"
After saving this change, unplug the camera, exit all INDI software, and reconnect.
At this point, the camera should work well.
Weird Cooling Process
Under certain conditions, the cooling graph looks weird. Temperature rises, and cooling power rises at the beginning.
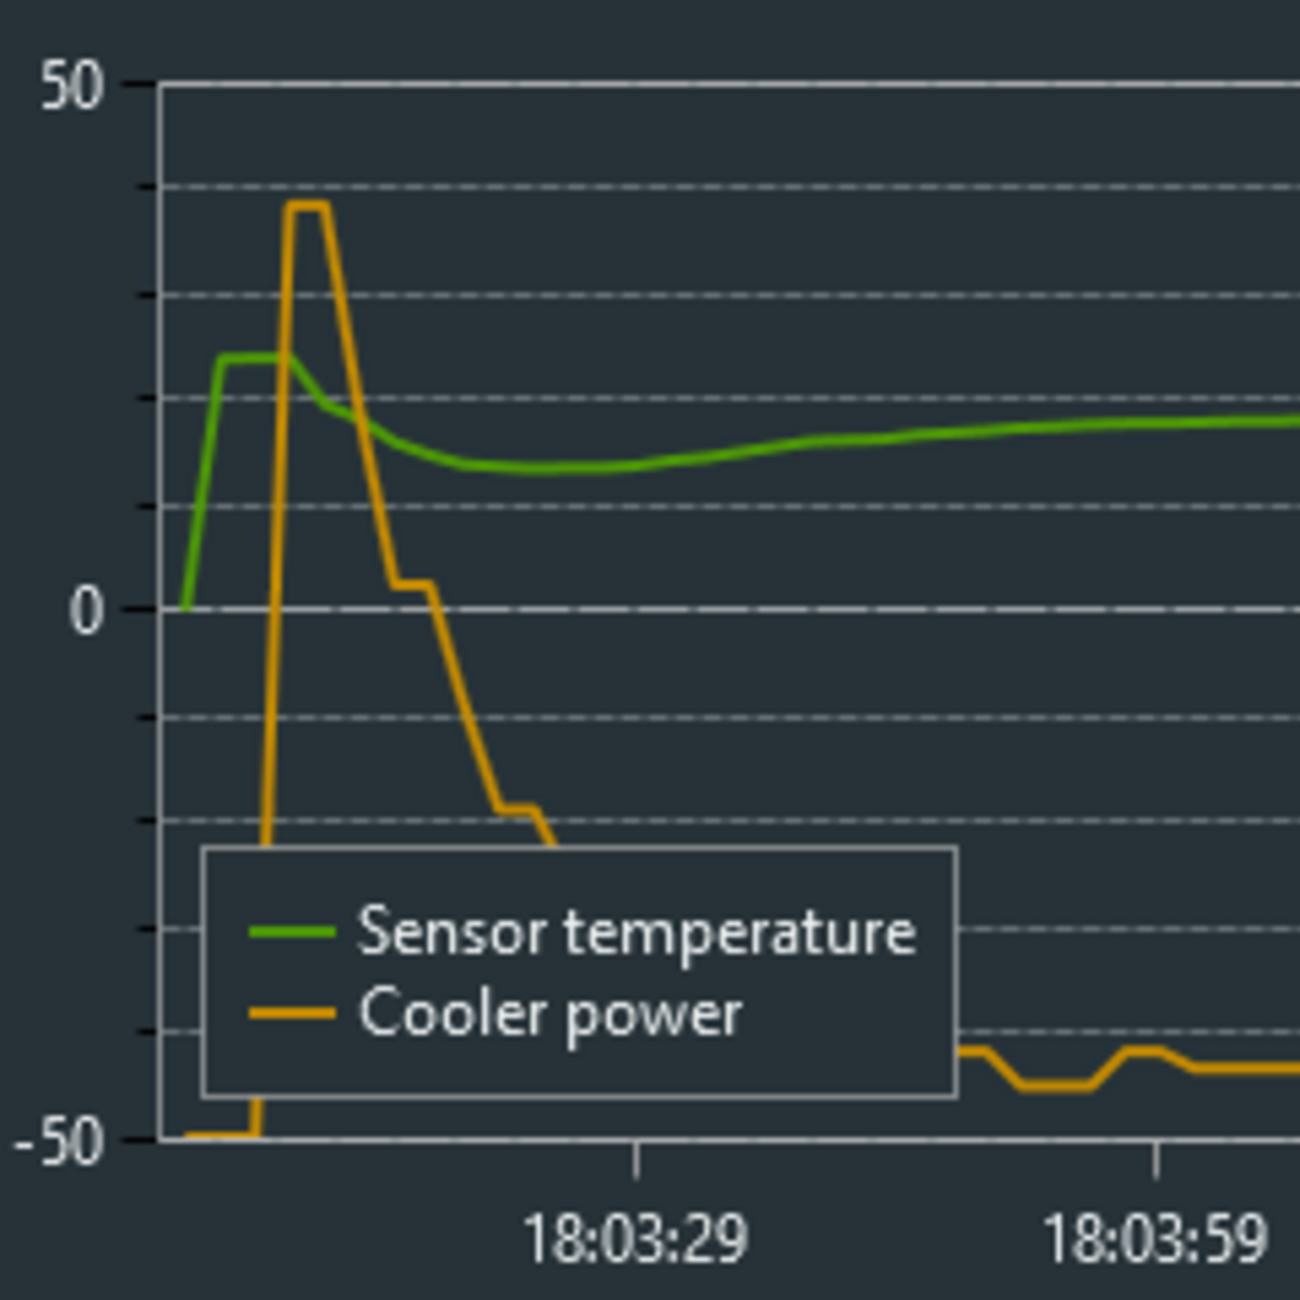
The logic of the cooling process is controlled by the software you use to control the camera; this is not a behavior of the camera itself.
During our tests, we have observed that this happens sometimes after a camera is accidentally unplugged or the software is turned off without disconnecting the camera using the "Disconnect" button in the software. When this happens, it is possible that on the next connection, the software still uses the last temperature measurement to initiate the cooling routine.
To correct this, try to restore everything to a clean state by using the disconnect button, shutting down the software, and unplugging the camera, in this order. When done, reconnect everything in the opposite order.
Help Us Improve
While we strive to ensure that our products meet the highest standards, occasionally, some issues may arise that we have not yet documented. We highly encourage you to let us know if you encounter any problems that are not listed on our known issues page.
Additionally, if you've discovered a workaround or a solution to an issue you've experienced, we would love to hear about it! Sharing your solutions can greatly assist other users facing similar challenges.
Your insights could lead to direct improvements in our manuals and troubleshooting guides.
We are looking forward to your input!